Pave Setting of Round Diamonds
Pave Setting is one of the most tedious setting styles to accomplish
which requires great deal of patience, skill and good tool control.
Below I have explained the procedure to set round diamonds in pave with perfection.
Setting Process
Following are the steps which describe the process of setting melees in pave set pendant.
Layout for Pave
Before setting diamonds in any setting, layout is essential as it helps in anticipating and avoiding problems. Before diamonds are set, setter must know the exact locations where are to be set.
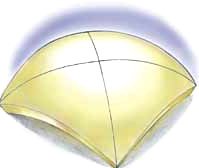
- Metal is tapped on to the dapping block to create a dome shape pendant. Scribe lines from opposite corners to find exact centre, it should form an X. Center is where both the lines intersect.
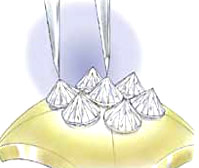
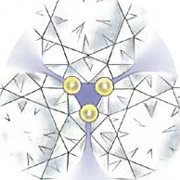
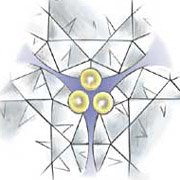
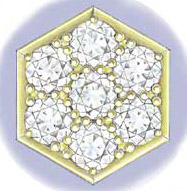
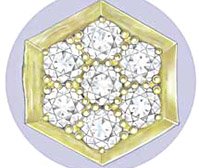
- Proceed by coating the metal sheet with a thin film of wax and place the seven diamonds in layout position (table down). Place the first diamond in the center (exactly on the intersection point of lines) and then place the remaining six diamonds symmetrically around the center one. The girdle of all seven diamonds should be nearly touching.
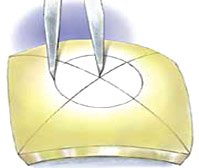
- Now, with a set of dividers measure the distance between the culet of the center diamond and the culets of the surrounding six diamonds. This distance is the radius. After measuring, diamonds are removed, cleaned and kept in proper order. With dividers which are still set to the radius distance scribe a circle on metal surface.
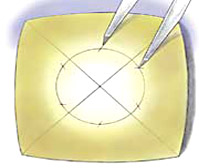
- Keep your dividers still set to the radius distance and mark six arcs around the perimeter of the circle. This is done by keeping one tip of the divider on the circle, mark a small arc bisecting the larger circle with second tip of the divider. Now place the divider’s tip to the intersection of the arc and circle and from here mark the second arc. Keep on moving around the perimeter of the circle till the last arc meet up with the first arc.
 |
 |
 |
 |
Seat Cutting
Begin by drilling holes that are 50% of the diamonds table diameter. With the help of ball bur or bud bur open the holes to 90% of the diamonds diameter and with the help of stone setting bur tool cut the seat.
It’s important to keep in mind that bur tool should match with the exact diameter of diamonds. Diamonds should fit tightly and firmly into the grooves you have created.
 |
| Seats of Stones |
Note that while working with melee less than 3mm in diameter, the seats must be deep enough so that the table of each stone is in same level with the top of the metal surface.
Stone Setting
Now, work to finally set your diamonds. Any hurry at this stage will spoil your work done so far. Trim away any excess metal left by burring and bearing.
Start placing the diamonds in their respective grove or seat in their setting position (table top). With the help of brass pusher, position each diamond into its respective groove.
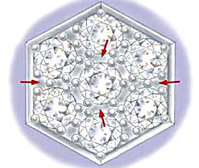
Verify that all diamonds are at the same level, are at uniform height and arranged symmetrically with even spacing.
Cutting of Prongs (Beads)
Prongs can be cut in following two ways:
- Common Prongs: In this method one prong will be shared by two diamonds. A small round graver tool roll the tips of the metal out and onto two diamonds. You have to keep in mind that one prong secures two diamond so roll the prongs slowly in several steps and not in single shot.
- Individual Prongs: In this variation, each diamond has its own individual prong.
 |
| Shared Prongs |
 |
| Individual Prongs |
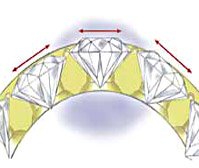
Always remember to roll the prongs onto the diamonds. To do this first seat the graver tool deeply into the metal, then use the graver face as a fulcrum to roll the prongs onto the diamonds. Avoid pushing the prong towards a diamond, as doing so metal can move the prong off at its base.
Now check with a 10X loupe or under microscope that prongs have even hold over diamonds and all prongs are at even height. At this point there should not be any movement in the set diamonds.
Final Finishing
Shape the prongs using an appropriate sizes beading tool to ensuring even and consistent round form.
 |
| Finished Pave Set Pendant |
Common Flaws of Pave Setting
Non-uniform Spacing
The beads are unevenly spaced and not of same size and don’t cover the diamonds.
 |
| Non-uniform Spacing |
Excess Spacing between Diamonds
There is excess metal left between the diamonds and are unevenly spaced.
 |
| Excess Spacing between Diamonds |
Metal Surface not Smooth
Diamonds are damaged while setting, tool marks have not been removed and metal surface is not uniform, smooth and scratch free.
 |
| Uneven Metal Surface |
Diamonds set at different Height
If the diamonds are set at different height then it’s a faulty workmanship.
 |
| Diamonds Set at Different Height |
Return from Round Pave Setting to Pave Setting page
Return from Round Pave Setting to Diamond Jewelry Homepage
I hope you'll not mind sharing this on Twitter, Facebook and with everyone else :)
Feel free to share if something is in your mind and want it to be covered on this site.
My Newsletter
Did you liked this article? Sign-up my FREE weekly newsletter and I'll send you more awesome new additions on this website along with latest jewelry happenings around the world, and download my Jewelry Design Album for FREE!
 |
|

| My Newsletter |
JOIN DJP EMAIL GROUP and download my Jewelry Design Album for FREE.

| Recent Posts |
About Me | Contact Us | Advertisers | Privacy Policy | Sitemap | Google+ | Megha Kejriwal
Copyright © 2010 diamond-jewelry-pedia.com. All Rights Reserved.
